

How To Take A Professional Headshot With Iphone
By the end of this article, you'll know how to take a professional headshot with a cell phone. Here's some of what's covered:
- How to get professional lighting with zero equipment – great lighting is the SECRET to great headshots
- A diagram showing you how to position yourself, both with AND without someone to help
- Some amazing (and free) apps to make the process easy (this includes changing the backdrop, retouching, and generally making the photo appear more professional)
- Bonus tips on clothing, hair and makeup, and much more.
Ready to get started? Scroll down to begin.
Don't want to be bothered with lighting and other details? We offer "Virtual Headshot" packages, where we take your photo over the internet and digitally retouch it to make the background and lighting professional.

There are three main things to keep track of when taking a professional headshot with an iPhone:
- Part 1: The Setup- The lighting and background must look professional, and the shot needs to be framed properly.
- Part 2: How You Look - Your clothing, hair, makeup, and body position must look good.
- Part 3: Your Expression - Even if your shot looks extremely professional, having a fake smile or bad expression can cause people to lose trust in you.
Part 1 of 3
"The Setup"
Shooting your professional headshot with unprofessional backdrops or lighting will make people wonder:
- "Why is he using an unprofessional picture on LinkedIn?"
- "Is she actually successful?"
- "Does he not pay attention to details or care about the first impression he makes?"
This is why getting a great backdrop and proper lighting is so important.
In this section I'll also share a few apps to make the process easier. We'll cover:
- How to position yourself so you get the right type of shot and angle.
- How to get a professional backdrop behind you (by using a real-life setup or a smartphone app).
- How to get great lighting in your photo.
Note: If you're an actor, you can learn all about actor headshots by reading this guide: Actor Headshots – The Ultimate Guide.
"The Setup"
Step 1 of 3: Position Yourself Properly
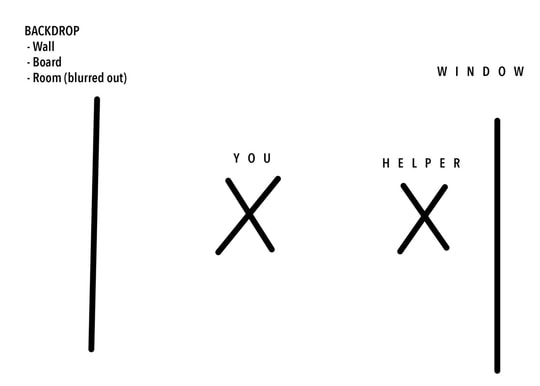
You can use this setup to take a headshot by yourself or have a friend help you out:
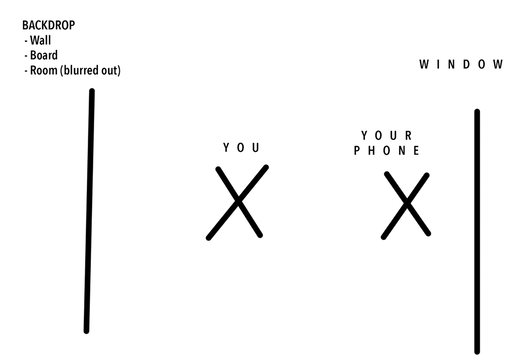
As you can see, if you do it yourself, you'll hold the phone up where it's marked in the diagram (with the window right behind it to light up your face). Just make sure to hold your phone in a way that makes it hard to tell you were actually holding your phone!
If someone helps you out, they'll be standing where "Your Phone" is. The window will be behind them and they'll be taking photos of you with a wall, backdrop, or blurred out background behind you.
We'll discuss backdrops and lighting in a moment.
Here's a photo of the setup for how to take your own headshot with an iPhone:
| | |
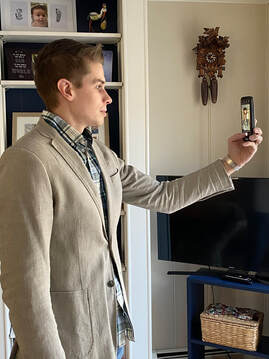

There are really no special tricks involved – it's just a matter of taking a bunch of shots and trying a few body positions and expressions.
When you've found a photo you like, you can use an app to finalize it so it looks more like a professional headshot, and then upload it to your LinkedIn profile.
"The Setup"
Step 2 of 3: Choose the Right Backdrop
Of course, beyond the darkness under my eyes, the backdrop is very distracting in the first shot above.
So let's talk about how to fix it so your shot looks professional!
Blurred, gray, blue, or white? Or something else?
| Original (No Background Change) | Blurred Backdrop | Flat Backdrop |


How to Get a Blurred Backdrop Behind You:
- Option 1 – Use Portrait Mode. The simplest way to get a professional headshot with your iPhone is to usePortrait Mode to blur out whatever is behind you. It can instantly make your photo appear more professional and there's almost no work involved on your part.
- Option 2 – Use a free headshot app for iPhone and Android. There are numerous apps that allow you to blur out the backdrop even more than Portrait Mode, which can take any headshot to the next level. We'll outline them shortly.
Check out the Before and After images below to get an idea of what your headshot could look like using a blurred backdrop app:
| Before | After |


As you can see, phone apps will never work perfectly (look above her right shoulder), but they can do a pretty good job of making the background less distracting.
How to Get a Flat Color Backdrop Behind You:
You have a few different options when it comes to getting flat backdrops behind you in your smartphone headshot:
- Option 1 – Use a professional headshot app to remove the backdrop. There are some free apps that allow you to manually cut out the background, and they use artificial intelligence technology to make it easier and faster. The downside is that no apps are perfect, so it might take some extra time and if you look closely, the edges around you could be a bit rough.
- Focos:This is an amazing app for Android or iPhone that blurs out the backdrop behind you a LOT!
- Magic Eraser Background Editor:This app lets you cut out the backdrop so you can put anything you want behind you. If you have Android, you can use this one:Background Eraser
- Option 2 – Stand against a wall so the background is flat and not distracting. Although it's easier than using an app, you might not be able to get the lighting to look as good because most people don't have windows that directly face a wall.
- Option 3 – Buy a white (or colored) poster board and have someone hold it behind you. It doesn't sound easy, but it's probably the most realistic-looking way to get a professional backdrop behind you, while positioning yourself in front of a window to get the best possible light (more on lighting soon).
- Option 4 – Have us do it for you. You can send us any photo you take and we'll use Photoshop to swap out the backdrop so it looks perfect. We'll also retouch blemishes, whiten teeth, and adjust the lighting and coloring so your headshot looks extremely professional. See pricing here.
Keep in mind that certain industries require specific backdrops. For instance, if you work as a lawyer in a conservative company, you might need a completely different backdrop than if you're
applying to medical residencies.
Or if you're an actor, a commercial headshot requires an entirely different backdrop than a legit (or theatrical) headshot. Learn what backdrop will work best for you in our "Actor Headshots Ultimate Guide."
Below are two different backdrops, and you can see how the feel of the shot changes completely from formal and serious to friendly and relaxed:
| Dark Gray Backdrop (formal and serious) | White Backdrop (friendly and relaxed) |


Although backdrop recommendations are beyond the scope of this article, we're happy to send you our in-depth guide for free:
Choose the Right Backdrop for Your Headshot
Download our Free "Headshot Backdrops Guide"
This quick guide was created to help you choose the proper backdrop for your headshot session. Whether you're anactor,author,business professional, or even doing photos foronline dating purposes, this guide will help you figure out what backdrop to use based on your profession and personal brand.
Here's what's covered:
| |

"The Setup"
Step 3 of 3: Ensure the Lighting is Great
Lighting is the secret sauce to make headshots look professional.
If you don't want people to know you took your headshot on your smartphone, you should spend a few extra minutes to ensure the lighting is good.
Can you see the problem with the lighting in the photo below?

Can you tell why this lighting is bad?
If you're not careful, you can get extremely dark shadows under your eyes when the lighting is not coming from the right angle!
The best light comes from in front and slightly above. It should come from a large source so it's very soft and doesn't create harsh shadows on your face.
For Great Lighting, Stand in Front of a Window:
The best way to get good lighting without any professional equipment is by standing in front of a window about 4 feet away.Make sure you're facing towards the window so that the light fills in your face (and be sure the sun isn't shining directly on you).
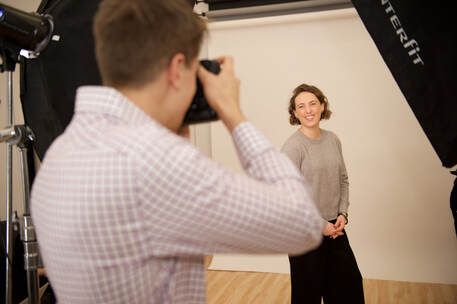
Here's an example where all lights were turned off in the room except the light coming from the window:

Great Lighting – Very few shadows on the face.
The window is right behind the camera, and all that soft light is coming down onto my face.
As a reminder, here's the setup and a diagram to reference:
| | |

The "Take Your Own Headshot" Toolkit
5 Great Headshot Apps PLUS a Video Tutorial
We've compiled a list of our 5 favorite apps to help you take a great headshot, plus created a short video tutorial with one of our expert studio photographers to show you exactly how to take your own professional headshot. Here's what's included:
| |

Part 2 of 3
"How You Look"
In the photo with the blue cardigan, my shirt collar is sticking out on one side, and not on the other. This is something that could have been fixed during the shoot.
While shooting, make sure to pay attention to:
- Posture: Stand up tall. If you think you look hunched, it could simply be the curvature of your spine. Try pointing your body at a slight different angle (like instead of turning left, turn to the right). This usually helps fix posture issues if standing taller doesn't seem to help.
- Clothing: Try to wear solid colors if possible, and make sure you're shirt isn't wrinkled! You can also read this great article on what to wear for headshots.
- Glare in glasses: A trick to fix glare is to angle your lenses down a bit. Basically you can raise the back part of the glasses off your ears so the lenses are tilted down. It shouldn't be noticeable in the camera but works really well!
- No flash: Make sure the camera flash is OFF or it will make you look shiny and unnatural in the picture.
- If you have a double chin, try doing "The Turtle": Push your forehead towards the camera by about an inch to help make your jawline sharper. Don't push too far or it will look weird... just do it a little bit.
Part 3 of 3
"Your Expression"
If your smile is fake, you won't connect with the viewer and it could create distrust!
So how do you get a real smile in your shot? Well, just look at the camera and start laughing!
Laughing is key to a good smile!
The simplest way to get a great expression, whether it's a big, open-mouthed smile or a subtle, closed-mouth expression, is to actually FEEL genuine.
You must feel good in the photo and imagine warmly greeting someone.
When you FEEL what you're projecting, it shows in ways that faking it never will.
Although advanced expression tricks are beyond the scope of this article, we have a great free guide you can read:
Want to Look Your Best in Your Headshot?
Download our FREE "Expression Secrets" Guide:
We'd like to show you the top secrets we've learned over the past decade - secrets we use to help our clients look moreprofessional,trustworthy, andconfident on-camera - within the first few minutes of their shoot.
After reading this short guide, you'll find it
way easier to present yourself exactly how you want in your photos, even if you're taking the photos yourself!
| What's included:
| |
Consider a "Virtual Headshot" Package
--About the Author of this Guide--
Martin Bentsen is an actor marketing coach who uses "outside the industry" thinking to help actors book more work. He's helped over 6,000 actors with their careers andactor headshots since 2009 and his photography studio City Headshots is ranked #1 on Yelp. He's spoken at NYU, The New England Theater Conference, The Actor's Green Room, and other venues.
Want to book more work by thinking strategically? Start with his freeActor's Toolkit to create new opportunities right away, or visit his website atwww.martinbentsen.com.
Further Reading:
How To Take A Professional Headshot With Iphone
Source: https://www.cityheadshots.com/spotlight-blog/how-to-take-headshots-with-your-iphone-and-no-other-equipment
Posted by: autennoter2002.blogspot.com
0 Response to "How To Take A Professional Headshot With Iphone"
Post a Comment